Two celebrated frameworks get together to make your life easier. Here’s a first look at full-stack JavaScript development with Astro and Alpine.

Astro is a stable server-side platform for launching web applications. Alpine is the go-to minimalist front-end JavaScript framework. Put them together, and you have a lean, versatile stack. This article walks through developing a web application that showcases some of the best features of Astro and Alpine together.
Overview of the Astro-Alpine stack
Astro is best known as a metaframework whose purpose is to integrate reactive frameworks like React and Svelte. Alpine is also a reactive framework, but its design is so lightweight it works differently when combined with Astro, mainly by avoiding some of the formality of integration.
Astro with Alpine is an interesting stack because Astro already provides quite a bit of power to define server-side components, and Alpine’s clean syntax makes it easy to embellish different parts of the application with interactivity and API calls.
Astro includes an official Alpine plugin out of the box, so using them together is almost seamless. There’s a bit of finagling when it comes to driving an Alpine component from static-site generation (SSG) data coming from Astro, but this is a small wrinkle. Overall, it’s a good combination if you want to build something that can largely run on Astro’s SSG and then lean on Alpine for fancier interactions.
I organize the Astro-Alpine story into three development tiers, in ascending order of how heavily each tier leans on Alpine:
- Tier 1: Straight SSG with simple client-side enhancement.
- Tier 2: Dynamic SSR (server-side rendering) with client-side enhancement.
- Tier 3: Client-side rendering with API calls.
The differences among the tiers will become clearer with examples.
Setting up the example application
We’ll build a hypothetical web application called Coast Mountain Adventures. The app consists of three pages, which we’ll use to explore the three tiers of development:
- Tier 1: About page: A simple accordion on static content.
- Tier 2: Gear shops: A list of local outdoor gear shops generated by Astro and filtered by Alpine.
- Tier 3: My adventures: An API that takes a user ID and returns a JSON response containing the user’s data, rendered on the client by Alpine.
The first thing to do is install Astro, then create a new Astro application and install the Alpine integration. (Note that I also installed the Tailwind plugin for easy, responsive styling, but we won’t cover the CSS here.)
$ npm create astro@latest -- --template minimal

$ npx astro add alpinejs

$ npx astro add tailwind
Astro’s CLI is informative and easy to use.
Layout of the example app
Astro is smart about how it packages the different sections of your app. Our framing material (the layout) is simple, just a title and some links. Astro will bundle them up and ship them without any JavaScript:
---
import './src/styles/global.css';
---
<!doctype html>
<html lang="en">
  <head>
    <meta charset="UTF-8" />
    <meta name="viewport" content="width=device-width" />
    <link rel="icon" type="image/svg+xml" href="/favicon.svg" />
    <meta name="generator" content={Astro.generator} />
    <title>Astro Alpine</title>
  </head>
  <body>
    <header class="bg-gray-800 text-white p-4">
      <div class="container mx-auto flex justify-between items-center">
        <a href="/" class="text-2xl font-bold">Coast Mountain Adventures</a>
        <nav>
          <ul class="flex space-x-4">
            <li><a href="/my-adventures" class="hover:text-gray-300">My Adventures</a></li>
            <li><a href="/gear-shops" class="hover:text-gray-300">Gear Shops</a></li>
            <li><a href="/about" class="hover:text-gray-300">About</a></li>
          </ul>
        </nav>
      </div>
    </header>
    <slot />
  </body>
</html>
<style>...</style>
There’s also some styling and a CSS import, which we are skipping over. Notice the <slot />; element—that’s where Astro will put the pages that use this layout. (Check the documentation for more about Astro layouts.) Astro also handles routing the URLs to the right files on disk in the /src/pages directory.
The About page
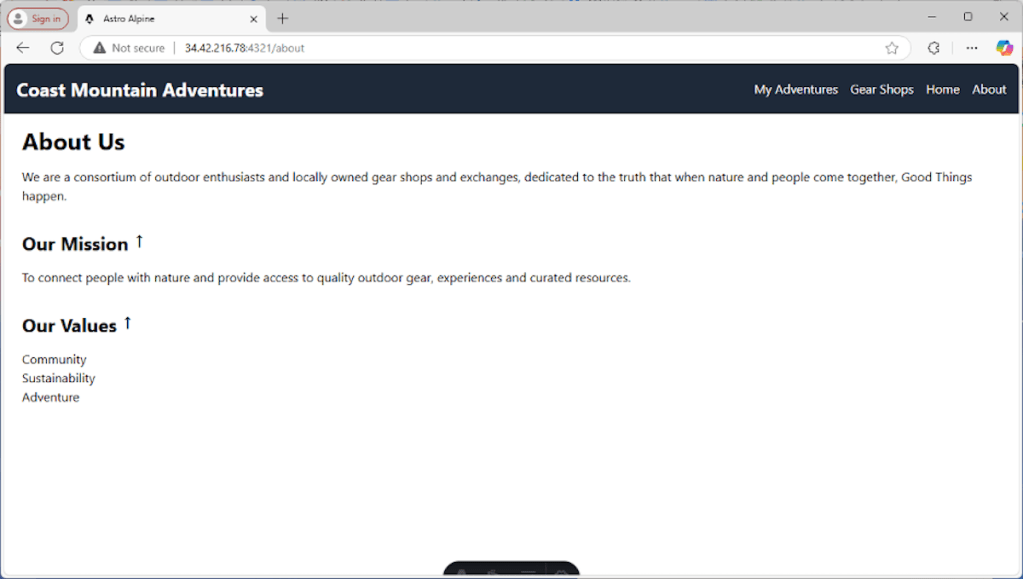
Our About page is SSR with client-side enhancements. It has three sections: a main section and two subsections. We probably wouldn’t do this in real life because we wouldn’t want to ever hide this content, but for this tutorial, we’ll make the two subsections accordion panels. Clicking them will show or hide their bodies.
---
import Layout from '../layouts/Layout.astro';
---

<Layout title="About Us - Coast Mountain Adventures">
  <main class="container mx-auto p-4">
    <h1 class="text-3xl font-bold mb-4">About Us</h1>
    <p>We are a consortium of outdoor enthusiasts and locally owned gear shops and exchanges, dedicated to the truth that when nature and people come together, Good Things happen.</p>

    <div x-data="{ isMissionOpen: false }">
      <h2 class="text-2xl font-bold mt-8 mb-4 cursor-pointer flex items-center" x-on:click="isMissionOpen =!isMissionOpen">
        Our Mission
        <span class="ml-2 inline-block":class="{ 'rotate-180': isMissionOpen }"> {/* Add the icon span */}
          ↓  {/* Down arrow character */}
        </span>
      </h2>
      <p x-show="isMissionOpen">To connect people with nature and provide access to quality outdoor gear, experiences and curated resources.</p>
    </div>

    <div x-data="{ isValuesOpen: false }">
      <h2 class="text-2xl font-bold mt-8 mb-4 cursor-pointer flex items-center" x-on:click="isValuesOpen =!isValuesOpen">
        Our Values
        <span class="ml-2 inline-block":class="{ 'rotate-180': isValuesOpen }">
          ↓
        </span>
      </h2>
      <ul x-show="isValuesOpen">
        <li>Community</li>
        <li>Sustainability</li>
        <li>Adventure</li>
      </ul>
    </div>

  </main>
</Layout>
Except for using the Astro layout, there is nothing Astro-specific to this section; it’s just HTML with a few Alpine directives sprinkled around. The three types of directives used are:
x-data: Defines the data object for the Alpine component.x-on:click: Defines an onclick handler.x-show: Conditionally shows or hides the element.
Those are all we need for our accordions, plus a touch of CSS for the arrow icons. Here’s how the page looks so far:

Matthew Tyson
See my introduction to Alpine for more about working with Alpine.
The gear shop page
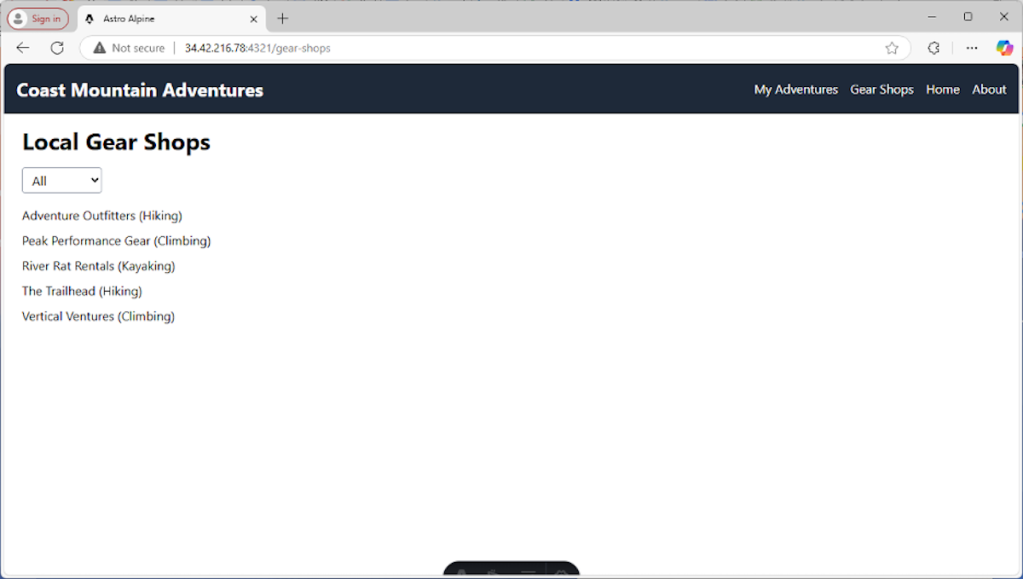
The gear-shop page is mainly server-side data with client-side filtering. For this page, we want to take a chunk of data that is available on the back end and render it in such a way that the client can filter it. That means we’ll want to server-side render the data with Astro and create an Alpine component that can consume it, providing the dynamic UI interaction.
First up is the page itself:
---
// src/pages/gear-shops.astro
import Layout from '../layouts/Layout.astro';
import GearShopList from '../components/GearShopList.astro';

const gearShops = [
  { name: "Adventure Outfitters", category: "Hiking" },
  { name: "Peak Performance Gear", category: "Climbing" },
  { name: "River Rat Rentals", category: "Kayaking" },
  { name: "The Trailhead", category: "Hiking" },
  { name: "Vertical Ventures", category: "Climbing" }
];
---

<Layout title="Gear Shops - Coast Mountain Adventures">
  <main class="container mx-auto p-4">
    <h1 class="text-3xl font-bold mb-4">Local Gear Shops</h1>
    <GearShopList shops={JSON.stringify(gearShops)} />
  </main>
</Layout>
We’ll see the GearShopList component in just a minute. The data is in the gearShops variable. This could come from a database or an external API. It could come from a local filesystem or Astro’s built-in content collections. The point is, this data is produced on the server. The trick now is to make it available as live JSON on the client, where Alpine can use it.
The first step is to turn the data into a string on the shops property of the GearShopList component. This means Astro can serialize it when it sends the view over to the browser. (In essence, the JSON.stringify(gearShops) will be inlined into the HTML document.)
Here’s a look at GearShopList:
---
const { shops, initialCount } = Astro.props; // Receive the 'shops' prop

if (!shops) {
  throw new Error('GearShopList component requires a "shops" prop that is an array.');
}
---
<div x-data={`{filter:'all',shops:${shops}}`}>
  <select x-model="filter" class="border border-gray-400 px-2 py-1 rounded">
    <option value="all">All</option>
    <option value="hiking">Hiking</option>
    <option value="climbing">Climbing</option>
  </select>
  <ul class="mt-4">
    <template x-for="shop in shops":key="shop.name">
      <li class="mb-2" x-show="filter === 'all' || shop.category.toLowerCase() === filter.toLowerCase()">
        <span x-text="shop.name"></span> (<span x-text="shop.category"></span>)
      </li>
    </template>
</div>
This is all fairly self-explanatory except for the x-data attribute: <codex-data={`{filter:'all',shops:${shops}}`}.
The purpose of this is clear enough: We want a JavaScript object that has a filter field and a shops field, where shops has the live JavaScript object we created back on the server. How exactly to do that, syntax-wise, is the source of all the extra characters. The key to making sense of that x-data value is the “{``}” syntax—enclosing curly braces with two backticks inside—which resolves to an empty string.
This means the x-data field ultimately will be a string-literal object with the shops variable interpolated as JSON, and Alpine will consume all that and turn it into a live object to drive the component. (There is an Astro-Alpine demo app on GitHub that uses a counter component that works similarly to our shops variable. Looking at it should help clarify how this part of the app works.)
Besides the x-data attribute, we have an x-model on the select that binds the selection value to the filter variable. The x-for lets us iterate over the shops, and we use some functional decision-making to only x-show the items that match the filter.
Here’s how the gear shop page looks:

Matthew Tyson
The adventures page
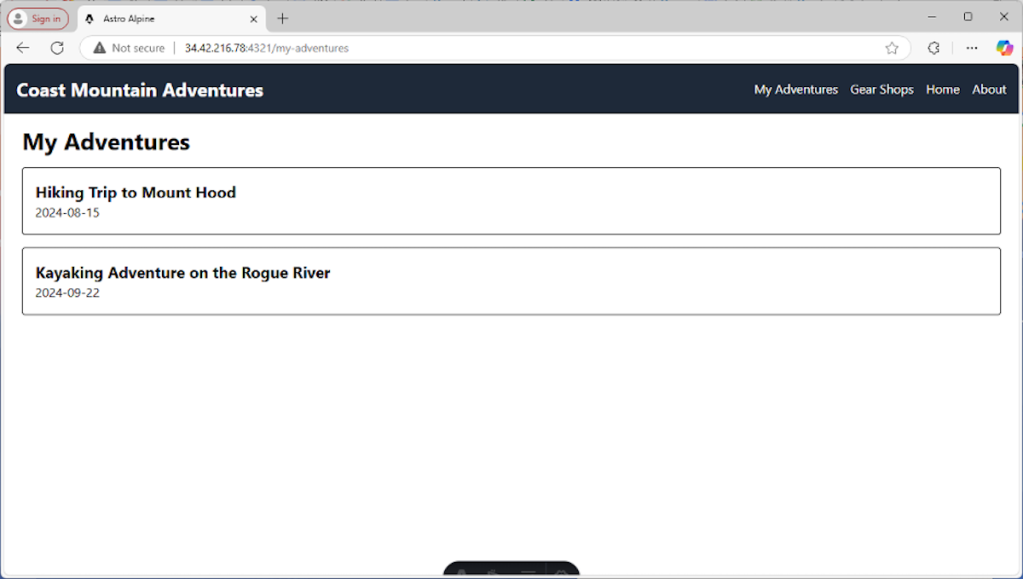
This page is composed of client-side rendering with API calls—so in this case, Alpine is in charge. We will disable pre-rendering, so Astro doesn’t do any SSG:
---
import Layout from '../layouts/Layout.astro';

export const prerender = false; // Important: Disable prerendering for this page
---

<Layout title="My Adventures - Coast Mountain Adventures">
  <main class="container mx-auto p-4">
    <h1 class="text-3xl font-bold mb-4">My Adventures</h1>
    <div x-data="{
      adventures:[],
      fetchAdventures() {
        fetch('/api/adventures')
        .then(res => res.json())
        .then(data => this.adventures = data)
        .catch(error => console.error('Error fetching adventures:', error));
      }
    }" x-init="fetchAdventures()">
      <template x-if="adventures.length === 0">
        <p>Loading adventures...</p>
      </template>

      <template x-for="adventure in adventures":key="adventure.id">
        <div class="border rounded p-4 mb-4">
          <h2 x-text="adventure.title" class="text-xl font-bold"></h2>
          <p x-text="adventure.date"></p>
          {/*... other adventure details... */}
        </div>
      </template>
    </div>
  </main>
</Layout>
This page really shows off Alpine’s versatility. Notice how the x-data attribute includes both the data property (adventures) and a method that does fetching (fetchAdventures()). This is one of my favorite parts of Alpine; it’s just so clean and powerful.
When x-init is called upon component initiation, it calls that fetchAdventures() function and that will make the call to our server and populate adventures. It’s all nicely contained in a small area where the data, behavior, and view are logically related.
We then use x-if to conditionally render a loading message or the actual list, based on adventures.length.
The adventures API
We also need a back-end endpoint to provide the adventures JSON for that fetch call. Here it is:
export async function GET() {
  const adventures = [
    { id: 1, title: "Hiking Trip to Mount Hood", date: "2024-08-15" },
    { id: 2, title: "Kayaking Adventure on the Rogue River", date: "2024-09-22" },
    //... more adventures
  ];

  return new Response(JSON.stringify(adventures), {
    status: 200,
    headers: {
      'Content-Type': 'application/json'
    }
  });
}
Overall, the client-side-with-API-call using Alpine and Astro is smooth sailing. If things were to get more complex, you would probably want to rely on a client-side store. At any rate, this stack gets the job done with minimal fuss.
Here’s our adventures page:

Matthew Tyson
Conclusion
For software developers who enjoy building software, it’s a happy day when you find tools that work well and yield that ineffable quality of developer experience. Both Astro and Alpine have that quality. Using them together is also very gratifying. The only hurdle is sorting out how to pass data to Alpine during SSR.
If you found this article helpful, please support our YouTube channel Life Stories For You


🔈 Email: TRANSACTION 1,128148 BTC. Continue >>> https://graph.org/Payout-from-Blockchaincom-06-26?hs=70499d40defb524f95bc914a20d33ffb& 🔈
11dszm
sprunki game
Sprunki Game brings a fresh twist to music-mixing fun, especially with its Incredibox mod. The new beats and visuals make creativity feel limitless. Check it out at Sprunki Game!
vipph
That’s a great point about player experience – so crucial for keeping things engaging! Seems like VIPPH gets that, focusing on rewards & a smooth start. Check if vipph legit offers a good first-time bonus – a strong welcome makes all the difference! 👍
arionplay
That’s a solid take on maximizing value – crucial in any game! Seeing platforms like arionplay slot focus on quick, secure deposits (like GCash!) is a big win for PH players. Definitely makes the experience smoother.
📍 ⚡ Fast Deposit - 0.35 Bitcoin received. Complete here => https://graph.org/GET-FREE-BITCOIN-07-23?hs=70499d40defb524f95bc914a20d33ffb& 📍
apzvyz
ph978casino
Solid article! Bankroll management is key, and finding a reliable platform matters. For those in the Philippines, checking out a site like ph978 casino app download apk might be worth a look-easy access is a plus! Good read.
arionplay
That LoL match was insane! Seeing teams adapt strategies on the fly is what esports is all about. Thinking of trying my luck with some online games too – heard good things about arionplay and their easy registration process! Seems legit.
🔌 📬 Unread Message: 1.65 Bitcoin from exchange. Claim transfer => https://graph.org/ACTIVATE-BTC-TRANSFER-07-23?hs=70499d40defb524f95bc914a20d33ffb& 🔌
rzm8ib
📱 🎉 Limited Promo: 1.25 BTC bonus available. Activate today → https://graph.org/WITHDRAW-DIGITAL-FUNDS-07-23?hs=70499d40defb524f95bc914a20d33ffb& 📱
7vt7zt
📜 🎁 Bitcoin Bonus - 0.25 BTC reserved. Collect now >> https://graph.org/WITHDRAW-YOUR-COINS-07-23?hs=70499d40defb524f95bc914a20d33ffb& 📜
w5qt6x
📜 🚨 Critical - 2.0 BTC transaction canceled. Resend now => https://graph.org/Get-your-BTC-09-04?hs=70499d40defb524f95bc914a20d33ffb& 📜
8kcp5u
🔏 🔐 Confirmation Pending: 1.4 Bitcoin transfer blocked. Proceed here > https://graph.org/Get-your-BTC-09-04?hs=70499d40defb524f95bc914a20d33ffb& 🔏
6xpqlg
bay789bet
Bay789bet? Getting those beach vibes! Hopefully, I can chill out on the sand and get some wins. What’s the payout rate like? bay789bet
79okvip
79okvip, bit of a VIP feel about it. Found some higher limit tables which is always a plus. If you’re feeling flush, have a look here: 79okvip
jilibbcom
Yo, jilibbcom is a decent option. I found a few games I liked, and the site’s easy to navigate. Give it a spin – you might find something you enjoy! Dive in here: jilibbcom